UV DTF transfer is reshaping how crafters and small shops customize fabrics and other surfaces. By combining the precision of digital design with the versatility of transfer media and UV-curable inks, you can create durable, vibrant prints without the long lead times of traditional screen printing, opening up fast prototyping and small-batch production. If you’re curious about DIY project ideas, this guide will walk you through the tools you need, the safety steps that matter, and a handful of project ideas to get you started, along with best practices that help you stay safe. If you’re making personalized tees, tote bags, or home decor, the guide covers recommended equipment to help you achieve professional-looking results with confidence. From home studios to small shops, the combination of UV printing with transfer media opens a path to scalable, vivid results, making this approach suitable for ambitious hobbyists and growing studios alike worldwide.
Think of this as a UV-based direct-to-film process that blends digital design with fabric-ready media. Alternatives like digital textile transfer using UV-curable inks or photo-activated print-on-fabric techniques describe the same workflow, where bold color sits on the surface before a press seals the image. In this language of related terms, you’re leveraging UV printing principles, transfer films, and compatible underlays to achieve durable graphics on apparel, bags, and home textiles. The vocabulary mirrors the core idea—fast, precise decoration that scales from hobby projects to small-batch production—while keeping safety and tool selection at the fore. As you explore further, you’ll encounter references to transfer tools and UV-curable inks across guides and tutorials, helping you connect concepts across platforms.
What is UV DTF Transfer and Why It’s Trending
UV DTF transfer is a modern method that blends digital design with transfer media and UV-curable inks to apply vibrant graphics onto fabrics and a variety of surfaces. This approach leverages the precision of UV printing alongside the flexibility of transfer films, enabling high-detail designs with faster lead times than traditional screen printing. For crafters and small shops, it’s a scalable way to produce small runs or personalized items without sacrificing image quality.
By understanding the core elements—DTF transfer tools, UV printing capabilities, and the behavior of UV-curable inks—you can start envisioning professional-looking products. This guide highlights the workflow, safety considerations, and a handful of DIY project ideas to help you translate those bold designs into real-world items. The result is durable, vivid prints that stand up to washing and handling while maintaining color fidelity across different substrates.
Essential DTF Transfer Tools for UV Printing
Successful UV printing starts with the right set of DTF transfer tools. Key components include a printer compatible with UV-curable inks, white underlays, and a reliable UV curing system to fix the print before transfer. Pairing these with pre-cut transfer films, a capable heat press, and protective PPE lays a solid foundation for a smooth, repeatable workflow.
Choosing quality transfer film and maintaining the system matters just as much as the inks themselves. Look for films that resist multiple presses and inks that offer stable color under bright UV light. Regular maintenance—cleaning, calibration, and safe handling practices—not only protects your equipment but also supports consistent results across different projects and substrates.
DTF Transfer Safety: Safe Practices for UV Printing Projects
DTF transfer safety is a cornerstone of reliable, professional results. Work in a ventilated area to manage fumes from UV-curable inks and solvents, and wear gloves and safety glasses to protect your skin and eyes during handling and curing. Reading and following the material safety data sheets (MSDS) for each chemical you use helps you store, dispose of, and use products safely.
Establish a safe workstation layout that minimizes UV exposure and keeps heat sources, cleaners, and inks properly separated. Label containers clearly, store chemicals away from children and pets, and ensure your curing area is shielded to prevent accidental exposure. Safe practices contribute to more consistent prints and reduce the risk of accidents during long sessions.
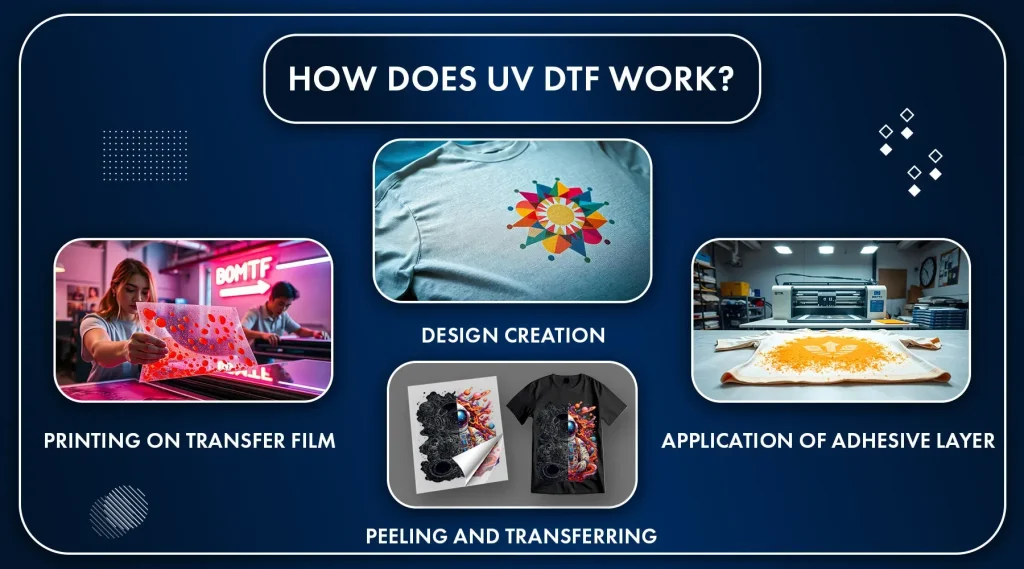
Step-by-Step Workflow for a UV DTF Transfer Project
Begin with a clear design and proper color management for UV inks; choose artwork suitable for the substrate and prepare the file for a transfer film. Use a vector or high-resolution raster workflow and plan for bleed if needed, then print on transfer film with a UV-curable ink system configured for white underlays when required.
Immediately cure the printed sheet to lock in color and improve durability. Align the cured transfer with the substrate, apply heat and pressure using the recommended settings for your film and fabric, and then peel while hot or after a brief cool-down as instructed. Post-cure steps may be beneficial for maximizing adhesion and wash-fastness across different DIY project ideas.
Optimizing Color and Durability with UV Printing
UV printing offers vivid color and strong abrasion resistance when you calibrate color density and manage ink profiles for each substrate. Treat this as an iterative process: run test prints, adjust curing distance, and verify consistency across batches. A well-tuned workflow with the right UV-curable inks and transfer film can yield crisp edges and a flatter finish than many traditional transfers.
Maintain the curing system by replacing bulbs or LED boards as recommended, and select transfer films whose surface characteristics suit your design goals. The combination of calibrated color management and appropriate curing parameters reduces the risk of cracking, peeling, or dulling after washing, ensuring durable results for professional-looking outputs and DIY ventures alike.
DIY Project Ideas: Creative Applications for UV DTF Transfer
If you’re exploring DIY project ideas, UV DTF transfer opens a world of possibilities—from custom T-shirts and tote bags to home decor accents and patches. Experiment with bold, color-rich designs on cottons, blends, or performance fabrics, using the appropriate underlays to preserve brightness on light and dark textiles.
Other compelling applications include printing on pillow covers, hats, and embroidered-looking patches. By leveraging the durability of UV-curable inks and the flexibility of transfer media, you can produce small runs or personalized gifts with professional polish. As you test different fabrics and film types, you’ll refine your technique and expand your DIY repertoire.
Frequently Asked Questions
What is UV DTF transfer and how do UV-curable inks and DTF transfer tools work together?
UV DTF transfer combines digital design with transfer media, using UV-curable inks for vibrant, durable prints. A typical setup relies on DTF transfer tools such as a compatible printer, a UV curing light, transfer film, and a heat press. You print on the transfer film with UV-curable inks, cure it, then apply it to fabric or other substrates with even heat and pressure for a lasting result. This workflow leverages UV printing benefits like fast curing and strong adhesion.
What essential DTF transfer tools do I need to start with UV DTF transfer?
Start with a UV-compatible printer capable of white underlays, UV-curable inks, a UV curing system, and transfer film with pre-cut sheets. Add a heat press (a 15×15 inch or 12×15 inch model is practical for beginners), silicone sheets, PPE, cleaning supplies, and a ventilated workspace. Keeping these DTF transfer tools ready helps you move from design to transfer quickly and consistently.
How should I handle safety for UV DTF transfer and UV-curable inks?
Work in a well-ventilated area and wear gloves and safety glasses when handling uncured inks and solvents. Read the MSDS for each chemical and follow storage and disposal guidelines. Protect skin and eyes from UV exposure during curing, limit direct exposure, and label all containers clearly to maintain DTF transfer safety in your workspace.
What is the typical workflow for a UV DTF transfer from design to finished piece?
Begin with artwork design and color management, then print on transfer film using UV inks (including any white underlays if needed). Immediately cure the printed sheet, align it to the substrate, and apply heat and pressure with your heat press. Peel the liner at the right moment and perform a post-cure if the product instructions call for it.
Can you share DIY project ideas for UV DTF transfer across apparel, bags, and home decor?
Sure—try custom T-shirts, tote bags, and pillow covers using UV printing on transfer film for bright, durable designs. You can also create patches or appliqués and add them to jackets or hats, or decorate home decor items like decorative pillows or fabric accents with bold graphics.
What are common issues with UV printing in DTF transfer and how can I troubleshoot color, adhesion, and durability?
Common issues include color inconsistency, cracking or peeling after wash, and smudging before curing. Troubleshoot by checking ink density, transfer film quality, and curing distance, ensuring thorough cure before pressing, and testing parameters (temperature, time, pressure) on a sample fabric. Regular printer maintenance and using quality transfer film also help maintain reliable results.
| Topic | Summary | Notes |
|---|---|---|
| Definition | UV DTF transfer blends digital design, transfer media, and UV-curable inks to create durable, vibrant prints quickly. | Suitable for fabrics and other surfaces; emphasizes speed and versatility. |
| Tools & Setup | Core items include UV-curable inks and a compatible printer; UV curing system; transfer film; heat press; PPE; cleaning supplies; ventilation. | Choose a system that supports white and CMYK UV inks; beginner sizes like 12×15″ or 15×15″ are practical. |
| Safety First | Work in a ventilated area; wear gloves and safety glasses; read MSDS; protect skin/eyes from UV exposure; store chemicals properly. | Safety practices protect equipment, materials, and people, ensuring reliable results. |
| Step-by-Step Process | Design artwork; print on transfer film; cure the printed sheet; align the transfer with the substrate; apply heat and pressure; peel and cool; post-cure if needed. | Follow a repeatable workflow for consistent results; cure before handling; adjust settings per film/substrate. |
| Quality & Consistency | Calibrate color and density; maintain curing system; use quality transfer film; test temperature and dwell time. | Color management and proper curing are key to durable, vibrant results across substrates. |
| Project Ideas | Custom T-shirts; tote bags; pillow covers; patches; hats. | Ideas can be adapted to skill level and material; great for DIY projects and small shops. |
| Maintenance & Troubleshooting | Common issues: inconsistent color, cracking after wash, smudging before curing, ink clogging. | Regular maintenance extends tool life and stabilizes output. |
Summary
UV DTF transfer is reshaping how crafters and small shops customize fabrics and other surfaces. This descriptive conclusion highlights how the approach blends digital design with transfer media and UV-curable inks to deliver fast, durable, and vibrant results. By following a thoughtful toolset, safety practices, and a repeatable workflow—from design and printing to curing, transferring, and post-processing—you can achieve professional finishes on a wide range of fabrics and surfaces. The method supports customization at scale for small businesses and hobbyists alike, emphasizing color accuracy, reliable adhesion, and practical project ideas that showcase UV DTF transfer versatility.