DTF curing and press settings are foundational to achieving durable, vibrant Direct-to-Film transfers across fabrics. Understanding how temperature, time, and pressure interact with ink, film, and substrate aligns with DTF temperature guidelines and helps you tune DTF curing time for reliable results. A well-calibrated Direct-to-Film heat press delivers consistent heat, while precise DTF pressure settings ensure the adhesive bonds evenly, supporting DTF ink curing. These variables influence adhesion, wash durability, and print fidelity, so testing swatches is essential. By starting with manufacturer recommendations and documenting outcomes, you create a repeatable workflow that minimizes misprints and maximizes color vibrancy.
From a practical standpoint, the curing stage and platen press conditions determine how well the ink dries, bonds, and stays vibrant on textiles. Think of it as the heat-setting and bonding phase, where calibrated dwell time and pressure interact with film adhesive and fabric texture to produce uniform transfers. By exploring related concepts such as activation temperature, curing duration, and load force, you tap into LSI principles that reflect how related terms cluster around DTF workflows. A well-designed calibration routine—using test swatches and recording outcomes—helps you translate theory into consistent performance across substrates. As you expand beyond basic guidelines, you will discover how ink chemistry and film choices alter the optimal heat, time, and pressure balance for each job.
DTF Temperature Guidelines: Setting Safe and Durable Heat for Your Transfers
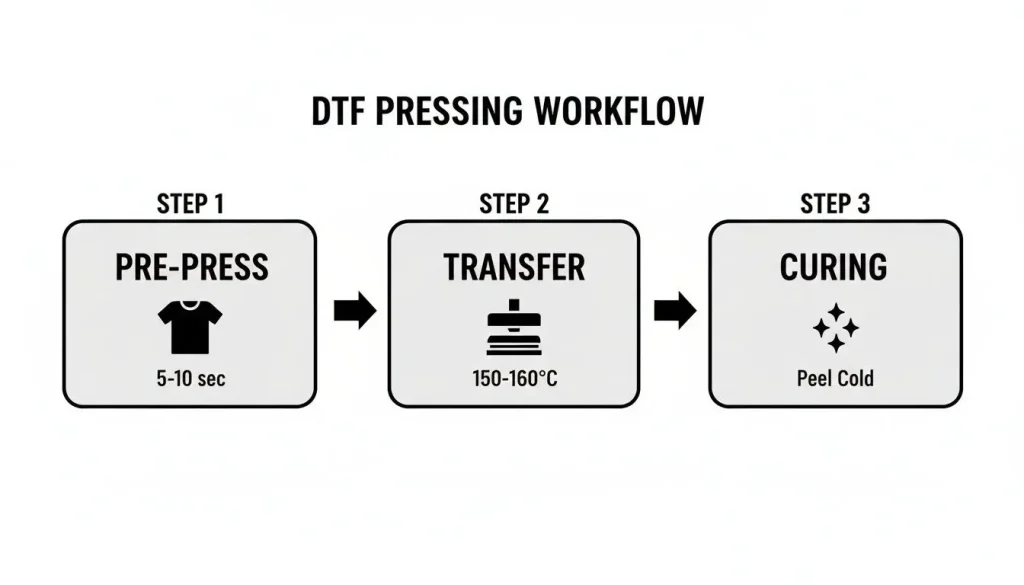
Temperature is the primary control knob for DTF results. Following DTF temperature guidelines helps prevent under-curing, which can lead to cracking, or over-bleeding, which dulls colors. A stable, uniform heat ensures the ink and adhesive activate correctly and bond to the fibers.
For common fabrics like cotton and cotton blends, start around 160–170°C (320–338°F) with moderate pressure for 10–15 seconds. Heavier fabrics may tolerate 165–175°C for longer times; delicate fabrics like rayon may benefit from lower temperatures and shorter times. Always test with swatches and consult your ink and film manufacturer’s guidelines for your specific product.
The goal is a stable, even heat across the platen. Use a calibrated heat press, preheat the platen, and monitor ambient conditions to minimize fluctuations.
DTF Curing Time: Understanding Dwell Time and Ink Bonding
DTF curing time, distinct from dwell time in some workflows, refers to how long the ink and adhesive have to reach full cure during the press cycle. The ink must dry and the film adhesive must activate for a durable bond.
Typical dwell times range from 8 to 20 seconds at a given temperature, depending on fabric and ink chemistry. Starting around 12–15 seconds is common; adjust based on observed results.
Post-press cooling matters too; allow the garment to cool briefly to prevent edge curling and reduce cracking as the print ages.
DTF Pressure Settings: Achieving Uniform Adhesion Across Fabrics
Pressure ensures adhesive penetration and film contact. The target is uniform force across the transfer area; too little yields edge lift, too much can compress the fabric.
A typical target is about 15–20 psi (1.0–1.4 bar) on standard presses. If the fabric has a textured surface, you may need a bit more pressure to achieve full contact; smoother fabrics may require standard medium pressure.
Use a silicone mat and non-stick sheet to distribute heat and prevent print imprinting. Always test on swatches to dial in the right pressure for each fabric.
Direct-to-Film Heat Press Essentials: Equipment, Platen, and Preheating Best Practices
Direct-to-Film heat press quality and platen distribution impact consistency. Look for even platen temperature and uniform contact across the transfer area.
Preheat the platen to the target temperature and let it stabilize before transferring. Use silicone sheets or heat-resistant parchment to protect prints and help achieve uniform heat transfer across the design.
Check fabric surfaces for moisture and lint; a clean, dry surface improves adhesion and reduces the risk of lifting corners.
DTF Ink Curing: Ink Formulation, Adhesion, and Post-Cure Behavior
Ink formulation determines curing behavior and adhesion. Different pigments, carriers, and binders cure at different rates; ensure compatibility with the film adhesive and fabric.
Keep batch-to-batch tracking for ink and film to capture curing variability. Conduct laundering tests after cure to confirm wash durability and color fidelity.
Test color fidelity and adhesion on representative fabrics, adjusting as needed to maintain consistent results across runs.
DTF curing and press settings: Balancing Temperature, Time, and Pressure for Consistent Results
This section synthesizes temperature, dwell time, and pressure to achieve repeatable results across batches and fabrics. Precise balance prevents over-curing on some materials and under-curing on others.
Create a calibration workflow with swatches, document planned temperature, time, and pressure, and adjust one variable at a time to isolate effects.
When adjustments are needed, start with small changes in pressure or time, validate the outcome, and maintain logs and manufacturer recommendations to guide future runs.
Frequently Asked Questions
What are DTF temperature guidelines and how do they influence curing with a Direct-to-Film heat press?
DTF temperature guidelines define the heat level used to cure the ink and activate the film adhesive when using a Direct-to-Film heat press. Start ranges: cotton and cotton blends 160–170°C for 10–15s; polyester-rich fabrics 165–175°C for 12–20s; delicate fabrics 150–160°C for 8–12s, all under medium pressure. Always test with swatches and follow ink/film manufacturer guidelines; use a calibrated thermostat and stabilize platen heat for consistent DTF ink curing.
How does DTF curing time relate to dwell time on a Direct-to-Film heat press across fabrics?
DTF curing time refers to how long the heat press applies energy during transfer. Typical dwell times range 8–20 seconds; start at about 12–15 seconds and adjust for fabric type and ink chemistry. Longer dwell can improve adhesion on tougher fabrics, while shorter times reduce the risk of scorching. After pressing, allow the garment to cool to finish curing.
What are the best DTF pressure settings to ensure even transfers on a Direct-to-Film heat press?
DTF pressure settings should ensure uniform contact across the transfer. Target about 15–20 psi (1.0–1.4 bar) on most presses. If your press lacks a gauge, practice on swatches to achieve complete adhesion with minimal edge lift. Use a silicone mat and non-stick sheet to distribute heat and protect the print.
Why is DTF ink curing important for durability, and how should heat press configuration reflect DTF temperature guidelines?
DTF ink curing is critical for durability. Proper heat press configuration—temperature, time, and pressure—activates the film adhesive and cures the ink for strong adhesion and wash resistance. If you see shine or color bleed, lower temperature or shorten dwell time; if you see cracking, increase dwell time or heat slightly. Always refer to your ink and film guidelines when setting the Direct-to-Film heat press.
How can I calibrate DTF curing and press settings to ensure consistent results across different fabrics?
Calibration workflow: 1) Prepare swatches for each fabric type. 2) Print a standard design and label each swatch with target temperature, time, and pressure. 3) Cure at target temperature and dwell time, press with target pressure, then allow cooling. 4) Inspect for cracking, edge lift, or distortion and document results. 5) Iterate by adjusting one variable at a time and keep a log for future batches.
What common mistakes should be avoided when applying DTF temperature guidelines and DTF curing time with a Direct-to-Film heat press?
Mistakes to avoid: skipping preheating; inconsistent pressure without a gauge; using temperatures too high for the fabric; inadequate fabric prep; failing to test with new film or ink batches; not documenting calibration results. These undermine DTF temperature guidelines and DTF curing time, leading to adhesion failures.
| Aspect | Key Points |
|---|---|
| Core variables (Temperature, Time, Pressure) |
|
| Temperature guidelines by fabric |
|
| DTF curing vs pressing relationship |
|
| DTF pressure settings |
|
| Heat press setup |
|
| Ink and film considerations |
|
| Calibration workflow |
|
| Common mistakes |
|
| Benefits of mastering |
|
Summary
DTF curing and press settings are foundational to durable, vibrant Direct-to-Film transfers, and this conclusion highlights practical takeaways for any shop. By balancing temperature, time, and pressure with the ink, film, and fabric you use, you can achieve consistent results and improve adhesion, print longevity, and overall fidelity. A systematic calibration workflow, careful material considerations, and ongoing documentation help maintain high quality across batches and production runs. Embrace testing and iteration to adapt to different fabrics, inks, and films, and rely on manufacturer guidelines as your baseline for optimal DTF curing and press performance.