DTF printing, short for direct-to-film printing, has emerged as a powerful entry point into affordable, high-quality garment design. This method suits both beginners and seasoned designers, offering a versatile alternative to traditional heat transfer and screen printing. In this ultimate beginner-friendly guide, we’ll explore what this process is, how the DTF transfer process works, and how to set up a reliable workflow that yields durable, vibrant results. You’ll get hands-on tips about DTF printer setup, the DTF powder adhesive, and DTF fabric printing tips to maximize color and adhesion. Whether you’re printing on cotton, blends, or certain synthetics, mastering these concepts helps you avoid common pitfalls and deliver professional transfers.
Beyond the exact term DTF printing, you can think of this as a film-based transfer workflow for textiles. In this model, the artwork is printed onto a special PET film and then transferred to fabric using heat and an adhesive layer, a method often called the DTF transfer process in practice. Other ways to frame it include a direct-to-film system, a film-on-fabric technique, or a transfer-on-film approach that suits cotton, blends, and even some synthetics. For designers investigating this method, LSI-friendly terms to search include film-based printing, powder-assisted transfer, and heat-press compatible decorations, with careful attention to printer setup, ink choices, and curing temperatures.
DTF Printing Basics: What Direct-to-Film Printing Is and Why It Matters
Direct-to-film printing, often shortened to DTF printing, is a transfer-based method that prints designs onto a specialized PET film using water-based inks. A white underbase is commonly laid down on dark fabrics to maximize vibrancy, followed by color layers. This approach differs from DTG and traditional screen printing, offering a flexible workflow and broad fabric compatibility.
For beginners, understanding the DTF transfer process and the final bonding step with heat is essential. The film carries the ink while the adhesive powder bonds the design to fabric, leaving the film behind. This method can yield durable transfers with vivid color and fine detail across a range of fabrics, making it a practical entry point into professional garment design.
DTF Transfer Process Unpacked: From Design to Bonded Garment
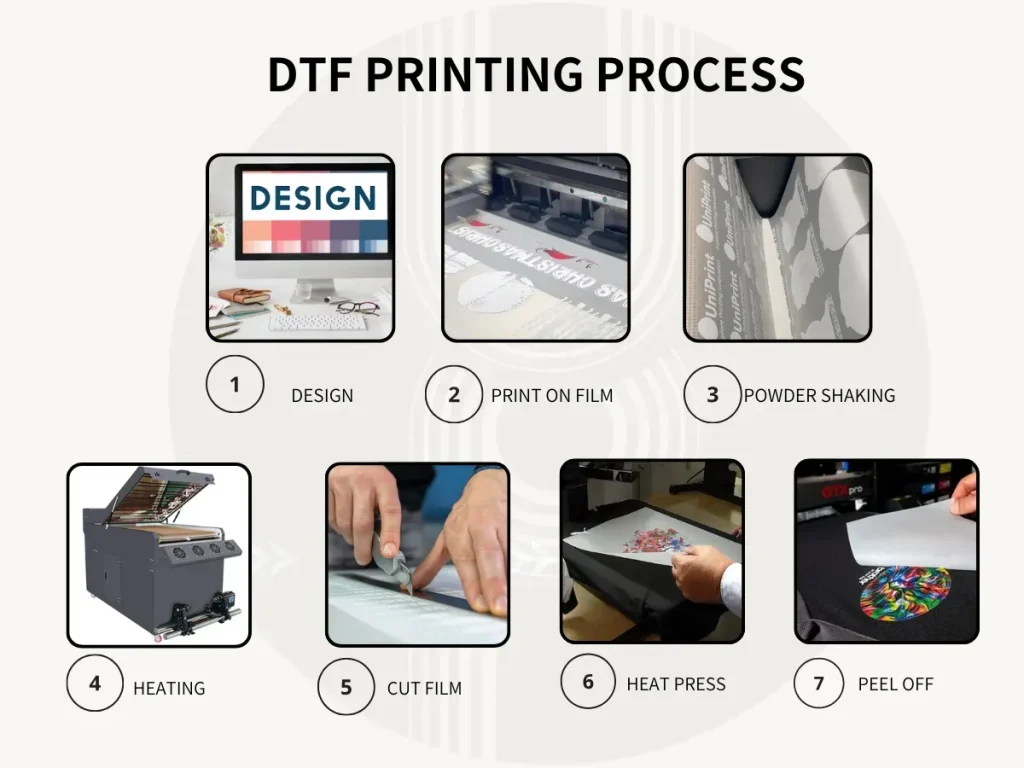
The DTF transfer process starts with design and preparation: convert artwork to a print-ready file, use vector outlines, and ensure high-resolution raster elements (at least 300 DPI). Include a white underbase for dark fabrics to preserve color brightness and ensure predictable results when layers are printed on PET film.
Next comes printing on PET film using a DTF-compatible printer and film, followed by powder coating while the ink remains tacky. After a brief cure, the design is transferred to the garment with heat and pressure, then peeled to reveal the bonded image. Proper timing, temperature, and humidity control are key to achieving consistent, durable results.
DTF Printer Setup for Beginners: Equipment, Profiles, and Workflow
Your DTF printer setup influences print quality almost as much as the artwork itself. Start with a dedicated DTF printer, compatible white ink options, appropriate films, and a reliable adhesive powder. A well-chosen ecosystem helps ensure consistent performance and easier maintenance for first-time users.
During setup, prioritize color management through ICC profiles, proper calibration, and access to dependable color guidance. Ensure your printer supports white ink for dark fabrics, and establish a repeatable workflow that includes regular nozzle checks, maintenance routines, and approved media for predictable, high-quality transfers.
DTF Powder Adhesive: Selection, Application, and Curing for Durability
DTF powder adhesive is essential to the transfer process. Choose formulations that melt evenly, bond cleanly to the ink, and release from the film after transfer. Different brands may have slightly different curing requirements, so consistency in application thickness and curing is crucial for durable results.
When applying powder, maintain a uniform layer and cure thoroughly to prevent powder residue or flaking. If you notice gritty textures or incomplete transfers, review curing time and ensure proper film-to-cloth contact during the press stage to maximize bond strength.
Fabric Selection and Design Tips for DTF Printing
DTF printing excels across cotton, cotton blends, poly blends, and some synthetics, offering flexibility in garment design. To maximize performance, consider how fabric color, texture, and fiber content influence ink density and the need for a white underbase. These factors also guide underbase decisions for vibrant transfers.
A thoughtful approach to fabric selection includes testing on representative samples and planning for how designs wrap or curve across seams. For designers seeking practical guidance, consult DTF fabric printing tips that cover image placement, bleed areas, and how heat settings interact with different fibers to preserve detail and color fidelity.
Troubleshooting, Maintenance, and Longevity of DTF Inks and Films
Even experienced printers encounter challenges, such as under-inked whites, powder adhesion issues, or imperfect transfers. When whites don’t print cleanly, verify the white ink supply, profiles, and printer priming for white ink performance to restore brightness.
Ongoing maintenance is essential for durability. Regularly clean the printhead, replace worn components, and store films in a dry, dark environment. Monitor ink and adhesive powder chemistry to prevent clogs and color shifts, ensuring that your DTF prints withstand washes and wear over time.
Frequently Asked Questions
What is direct-to-film printing and how does the DTF transfer process work?
Direct-to-film printing uses a printer to apply designs onto a PET film with water-based inks, often with a white underbase for dark fabrics. In the DTF transfer process, an adhesive powder is applied to the film, the coating is cured, the film is placed on the garment, and heat and pressure bond the design to the fabric. The result is vibrant color, fine detail, and broad fabric compatibility with a relatively streamlined workflow.
How should I approach DTF printer setup for reliable results?
DTF printer setup for reliable results starts with a compatible printer, the right PET film, and a proven adhesive powder. Ensure the printer supports white ink for dark fabrics, install color-management profiles, and calibrate ink density regularly. Maintain consistent curing, temperature, and pressure in your workflow to produce durable transfers.
Why is DTF powder adhesive important and how is it applied in the transfer process?
DTF powder adhesive is essential for bonding the printed image to fabric. It’s applied while the ink is tacky, then cured so the powder forms a strong bond during heat pressing. Use a uniform layer to avoid areas without adhesion, and ensure thorough curing to prevent residue or flaking.
What are the best DTF fabric printing tips for different fabrics and colors?
DTF fabric printing tips include testing on cotton and blends, using a white underbase on dark fabrics, and adjusting heat, pressure, and dwell time to suit fiber content. Consider fabric color and texture, plan for underbases when needed, and design with high-resolution artwork to preserve detail across fabrics.
How can I troubleshoot common issues in DTF printing to improve results?
Common DTF troubleshooting steps: verify white ink supply and color-profiles if whites print poorly; check powder application and curing to prevent adhesion problems; review heat press settings and film-to-cloth contact to resolve transfer defects. Regular calibration and a controlled environment help prevent recurring issues.
How can I optimize color fidelity in direct-to-film printing and the DTF transfer process?
To optimize color fidelity, use proper color management with ICC profiles, plan white underbases for dark fabrics, and test color separations before production. Maintain consistent curing and press conditions, and rely on high-quality films and powders to minimize color shifts between the print and final transfer.
| Aspect | Key Points |
|---|---|
| What is DTF Printing? |
|
| DTF vs DTG and Other Methods |
|
| Main Steps in the DTF Transfer Process |
|
| DTF Printer Setup |
|
| Powder Adhesive |
|
| Fabrics and Design Considerations |
|
| Design Tips for High-Impact DTF Printing |
|
| Troubleshooting Common Issues |
|
| Maintenance and Longevity |
|
Summary
Conclusion: A Practical Path from Beginner to Pro
DTF printing offers a compelling blend of flexibility, cost-efficiency, and quality for modern apparel and textile projects. By understanding the DTF transfer process, investing in a reliable printer setup, mastering the adhesive powder and curing steps, and applying thoughtful design principles, you can build a robust workflow that delivers impressive results. Whether you’re printing on cotton tees, blends, or other fabrics, the fundamentals of DTF printing remain consistent: plan your design, manage color with underbase strategies, ensure proper powder curing, and apply heat with the right settings. With time and practice, DTF printing can become a cornerstone of your fast-turnaround, high-quality garment production strategy.