The idea of fabric patches is a practical, sustainable way to extend the life of clothing while adding personal style. Whether you’re mending a favorite jacket or refreshing a bag, this guide explains how to apply patches and highlights iron-on patches for quick results. You’ll learn the differences between fabric patches and embroidery patches, plus patch repair tips to keep items looking fresh. With simple steps, durable techniques, and tips on sizing and placement, you can transform worn fabric without sacrificing design. By the end, you’ll feel confident choosing the right patch type and applying it for lasting wear.
A different lens on the topic sees durable textile appliques and decorative patches as smart ways to mend wear while expressing unique style. These patch-like embellishments include heat-activated or sew-on options and are often described as garment embellishments, repair patches, or embroidered badges in catalogs. Thinking in these terms aligns with search behavior (LSI) and helps you explore alternatives like backing fabrics, decorative stitching, and design-forward patches. Whether you call them appliques, badges, or repairs, the goal remains the same: extend the life of fabrics while creating a signature look.
Fabric patches vs embroidery patches: choosing between practicality and style for fabric compatibility
Fabric patches and embroidery patches offer different textures, finishes, and levels of durability, making each suited to particular projects. Fabric patches are typically simple pieces of cloth that can cover flaws or add a decorative touch, while embroidery patches bring depth, shading, and a handcrafted feel. Understanding how each type behaves on common textiles—denim, canvas, twill, or delicate fabrics—helps you pick the right option for longevity and look.
When deciding, consider your goal: if you want quick coverage or a subtle enhancement, fabric patches may suffice; for a premium, professional appearance, embroidery patches can elevate a garment. Compatibility matters too: denim and canvas generally take iron-on or sew-on patches well, whereas silk or rayon may require gentler methods or protective backings. Maintenance expectations—how often you’ll wash and wear—also influence the choice between fabric patches and embroidery patches.
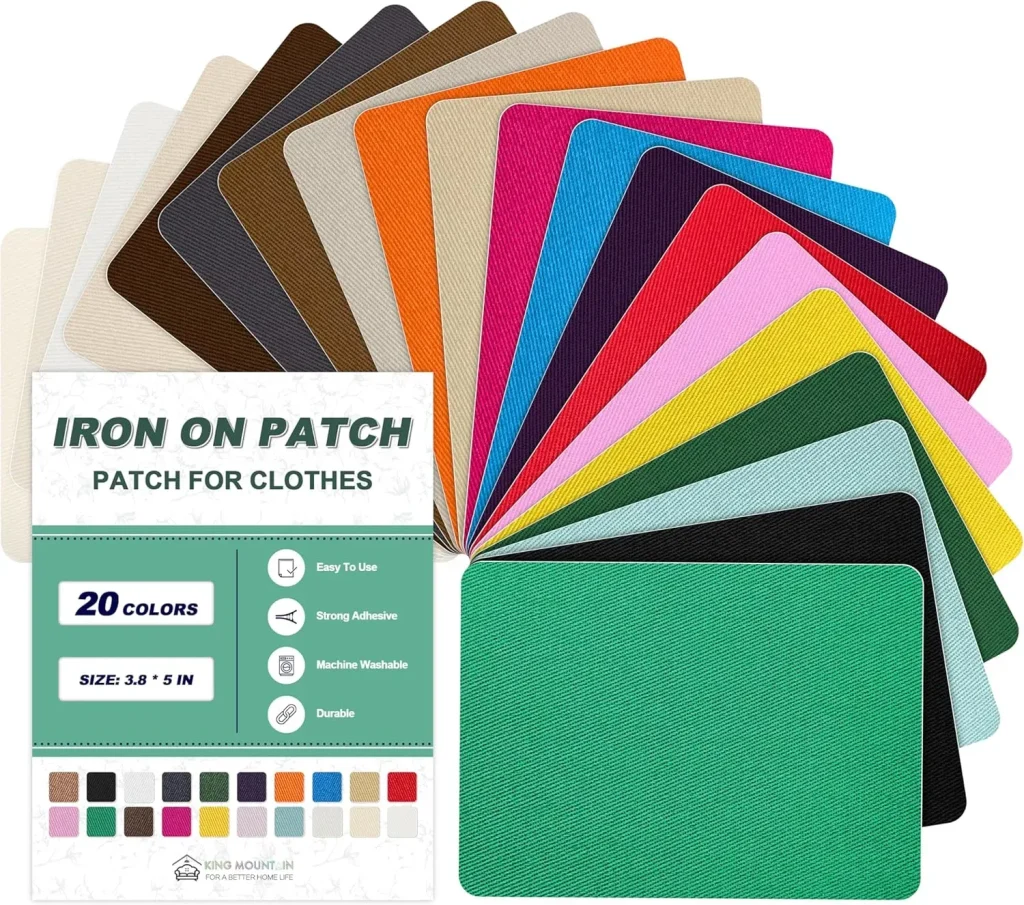
How to apply patches: iron-on patches, sew-on patches, and best practices for lasting adhesion
Applying patches starts with clean, dry fabric and clear placement. Iron-on patches offer a fast, clean finish, making them a popular choice for quick repairs or decorative accents. Preparing the surface, selecting heat settings, and using a barrier like parchment paper helps ensure a strong bond without scorching the fabric.
Sew-on patches provide a durable alternative when heat could damage a design or delicate fabric is involved. This method requires careful stitching around the edge, either by hand or with a sewing machine. Regardless of method, finish with secure stitching, press from the inside to flatten seams, and allow adequate cooling time to ensure the patch holds firm.
Patch repair tips to extend garment life and maximize patch durability
Patch repair tips emphasize proactive care and planning. Before applying patches, wash and dry the fabric to remove sizing and improve adhesion. Surface prep, edge sealing, and reinforcement behind high‑wear zones (knees, elbows) help patches resist fraying and delamination over time.
Ongoing maintenance is key: turn patched items inside out for washing, use mild detergents, and avoid high heat when possible. If a patch starts to peel, reseal edges with heat or re‑stitch as needed. Keeping spare patches on hand makes re‑patching quick and affordable, extending the garment’s life and preserving the look.
Choosing patch size, shape, and placement for style and durability
Size and shape influence both aesthetic impact and practical longevity. Small 2–3 inch patches are discreet and versatile, while larger 4–6 inch patches serve as bold focal points on jackets or bags. Round patches offer classic versatility, rectangular patches suit denim and totes, and irregular shapes can add a playful or vintage vibe.
Placement matters as much as size. Common spots include knees, elbows, pockets, cuffs, back patches on jackets, and the center front of totes. Plan ahead by testing layout with pins or removable markers, photograph the arrangement, and adjust before final adhesion or sewing to ensure balanced proportions and wear resistance.
Creative uses for fabric patches and embroidery patches, plus care and maintenance
Creative patch projects turn wear into self-expression. Use embroidery patches to add texture and depth to denim jackets, canvas bags, or hats, while fabric patches can create bold collage effects on a tote or backpack. Combining both types lets you layer color, texture, and storytelling into a single piece.
Care and maintenance for creative patches focus on preserving both the fabric and the design. Gentle washing, cold or warm cycles, and air drying help embroidery patches retain stitch integrity, while avoiding harsh chemicals protects adhesives and backing. Regular inspection and timely reinforcement keep your patchwork looking intentional and durable over many wears.
Frequently Asked Questions
What are fabric patches and embroidery patches, and when should I choose each type?
Fabric patches and embroidery patches are two common patch types with different looks and construction. Fabric patches are simple fabric pieces that cover wear or add style, while embroidery patches feature stitched designs for texture and a premium finish. Choose fabric patches for straightforward repairs or subtle decoration, and embroidery patches when you want a more decorative or professional look. Consider fabric compatibility and maintenance to decide which approach fits your project.
How to apply patches: what’s the difference between iron-on patches and sew-on patches?
Iron-on patches attach with heat, while sew-on patches rely on stitching. For iron-on patches, prepare the fabric, position the patch, cover with parchment or a cloth, and press with a hot iron for 15–30 seconds, then cool and check edges (re-press if needed). For sew-on patches, secure the patch with pins and stitch around the edge using a tight running or satin stitch, finishing with securely tied threads and a gentle press from the inside.
What patch repair tips help extend garment life?
Patch repair tips include pre-wear prep (wash/dry fabric to remove sizing), surface cleaning around the patch, edge sealing with a small sealant or glue for extra security, reinforcement in high-wear areas, and following care steps during washing and drying (turn items inside out, use gentle cycles, air dry when possible). Keep spare patches handy for quick re-patching.
How do I choose patch size, shape, and placement for fabric patches?
For fabric patches, plan size and shape based on location and wear. Small patches are typically 2–3 inches, while large patches or statement pieces can be 4–6 inches or larger. Shapes like rounds, rectangles, or shields suit different areas, and placement should consider seams, pockets, and wear zones. Test placement with a mock layout before final attachment.
What care steps keep patched garments lasting longer?
Care for patched garments by avoiding high heat that can damage patches, following backing guidelines, washing with mild detergents, and turning items inside out. Store patches in a cool, dry place away from direct sun, and regularly inspect edges for loose threads or fading. Proper care helps both fabric patches and embroidery patches stay durable and looking good.
| Aspect | Key Points | Notes / Tips |
|---|---|---|
| Patch Types | Fabric patches: decorative or functional fabric pieces; Embroidery patches: stitched designs with texture, depth, and premium look. | Embroidery patches last longer when properly applied; fabric patches offer quick, versatile options. |
| Choosing Patch Type | Consider purpose, fabric compatibility, and maintenance. Denim/canvas handle iron-on or sew-on; delicate fabrics may require backing or gentler methods. | Use purpose and fabric type as primary guides; test adhesion on scraps. |
| Tools & Materials | Patches (fabric or embroidery); iron-on backing or sew-on backing; iron/heat press; barrier (parchment); scissors; pins; chalk; sewing supplies (needle or machine); thread; fabric adhesive (optional); measuring tools; fray-preventive product (optional). | Organize a ready-to-use kit before starting a project. |
| Patch Application: Iron-On | Prepare fabric (clean/dry); position; cover with barrier; heat to patch backing; press 15–30s; cool; re-press edges if needed; optional edge seam. | Follow patch backing heat guidelines; avoid steam unless allowed. |
| Patch Application: Sew-On | Place patch; stitch around edge with tight stitches or zigzag; finish knots; press from inside to flatten. | Better for delicate fabrics or when heat could damage design. |
| Placement & Sizing | Plan location considering seams and wear areas. Small patches 2–3 inches; large patches 4–6 inches or more; shapes: round, rectangular, irregular; photograph layout before final attachment. | Aim for balanced, intentional layout; test placement. |
| Durability & Care | Edge sealing, washing guidelines (cold/warm, gentle), turn inside out, air dry; avoid harsh chemicals; reinforce high-stress zones. | Re-seal or re-stitch as needed to maintain longevity. |
| Creative Ideas | Mosaic denim patches; patch collages on bags; initials or logos; seasonal accents; reversible patching for inside-out looks. | Harmonize color palette; consider patch scale; mock layouts help planning. |
| Common Mistakes | Using too much heat or wrong settings; skipping prep; misalignment; choosing patches unsuited to fabric. | Always follow backing guidelines; prep and test first. |
| Embroidery Patches Care | Embroidery patches offer premium texture and longevity; ensure backing/batting resists fraying; gentle washing and air drying; avoid rough agitation. | Reinforce corners with extra stitching or glue if edges lift. |
Summary
Fabric patches transform worn garments into fresh statements, blending repair, expression, and sustainability. This guide clarifies how fabric patches and embroidery patches differ, how to choose the right patch type for your fabric, and how to apply patches for lasting results. By planning placement, selecting appropriate sizes, and following heat and stitch guidelines, you can extend garment life and create unique style statements with fabric patches. Whether repairing a jacket, mending a bag, or crafting a patchwork piece, these techniques empower you to customize with confidence. Remember: fabric patches are not just fixes; they are creative tools that tell your story through textile art.